This is not your grandma’s chocolate recipe.
It’s easy to make chocolate bars at home if you start by melting existing bars of chocolate. But why cheat? You can create a decadent bar of chocolate from scratch — and all you need is a fresh cocoa pod, ample outdoor space for fermentation, and a ton of patience. Guidance from a cocoa plantation supervisor couldn’t hurt.
Most city dwellers don’t have the resources to pluck, dry and grind cocoa plants into chocolate, but there is a workaround. The “Tree to Bar” tour at Hotel Chocolate in St Lucia takes visitors through the entire process, led by expert guide Cuthbert Monroque. We took the tour during a weekend vacation to the Caribbean this winter. At $45 per person ($65 for non-hotel guests), it was not cheap– but Cuthbert shared so many details of the cocoa harvesting process that we now have the skills to open our own chocolate plantation, which may help recoup costs.
Read on for step-by-step instructions for making chocolate the old-school way. If you’ve tried this at home, please share your experience in the comments section!

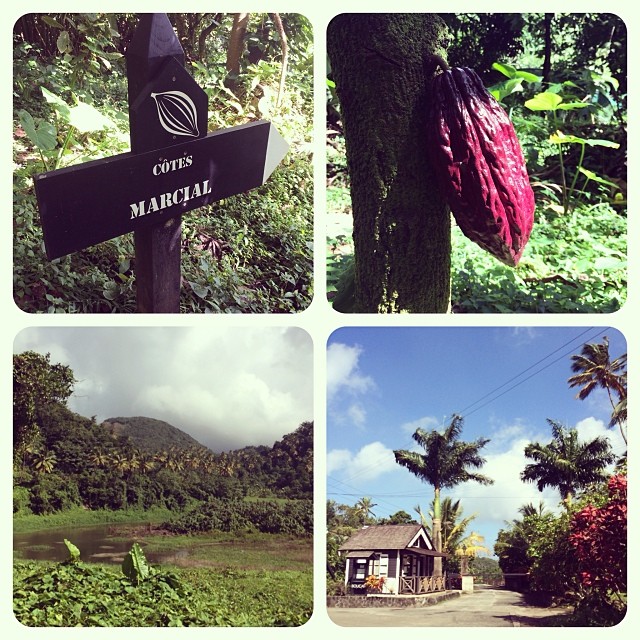
St Lucia, home of the Rabot Estates cocoa plantation.
1. Visit a Cocoa Plantation
To get the freshest ingredients, you’ll need to visit a tropical plantation where cocoa pods are grown and harvested. We stayed at Hotel Chocolate in St Lucia, which is surrounded by a working cocoa plantation called the Rabot Estate. I had never seen a real cocoa pod before our visit, and was surprised to discover that chocolate originates with brightly-colored, papaya-like fruits that sit high on trees.
2. Pick Fresh Cocoa Pods
The first step in making chocolate is plucking a pod from a cocoa tree (aka Theobroma cacao). The Hotel Chocolate “Tree to Bar” experience is well known in St Lucia and draws guests from neighboring hotels; we were staying at Hotel Chocolate and signed up on whim, not knowing anything about the tour. Our small group of American and British tourists was met by Cuthbert Monroque, a supervisor at the cocoa plantation with deep knowledge of agricultural methods. We stood in rapt attention as Cuthbert detailed the origins of cocoa plants (which are native to the Americas) and outlined the pros and cons of various cocoa species.
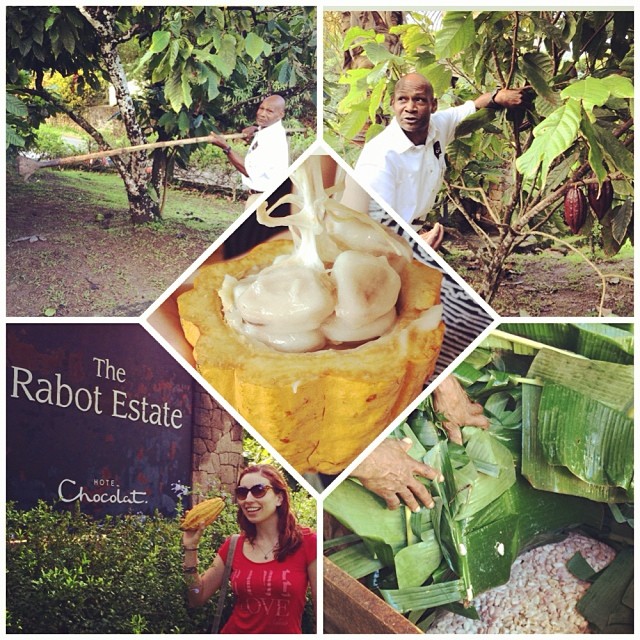
Under Cuthbert’s guidance, we used giant loppers to cut fresh pods from a tree. It was quick work with a sharp blade that resembled a Facebook “like” icon. As part of the demonstration, Cuthbert smacked a pod against the side of a paved road, perfectly cutting it in half and revealing the gooey, sweet seeds inside. He encouraged us to suck on the fresh beans, which tasted like lychees. The seeds dangled from the pod like an alien spine in a science fiction movie.
3. Ferment and Dry the Cocoa
There is a lot of work involved in transforming slimy, translucent cocoa seeds into aromatic, dark brown cocoa beans. This is where it helps to live on a plantation or makeshift urban farm, where you can ferment vats of cocoa seeds in banana leaves without interference from a coop board.
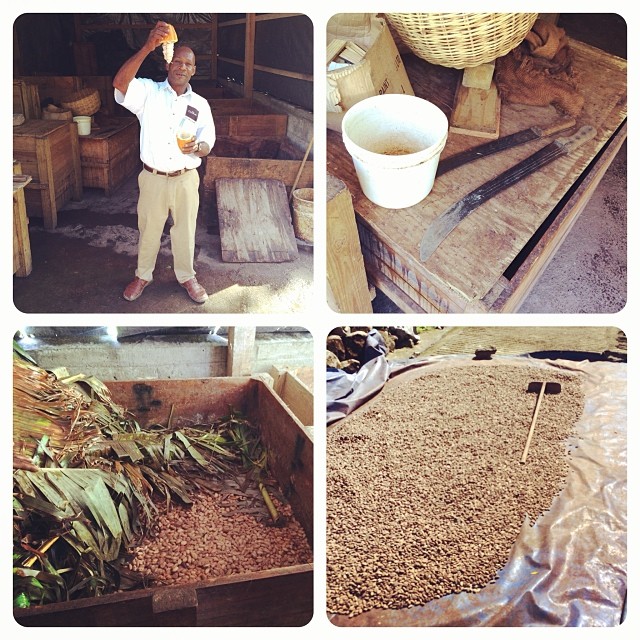
Placed in a series of wooden boxes and covered with banana leaves, the cocoa seeds begin to ferment. Their color darkens and they actually give off heat, making the banana leaves warm to the touch. As Cuthbert led a hands-on demonstration, we were encouraged to smell and fondle the beans at every stage of the process. When fermentation is complete, the beans are laid out on plastic tarps to dry in the Caribbean sun.
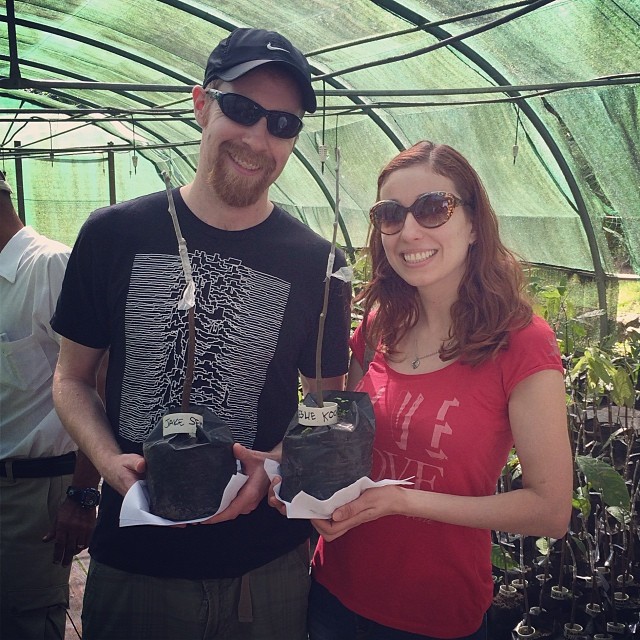
4. Graft Cocoa Plants
Sustainability is crucial to the cocoa industry; there must be a way to replace pods harvested for our decadent chocolate desserts. Cuthbert led us to a green house where cocoa seedlings are grafted onto healthy young plants. Under the watchful eye of a plantation worker, we each received a seedling to tape onto a potted plant. This was the same process followed by Prince Charles on a visit to the Rabot Estate.
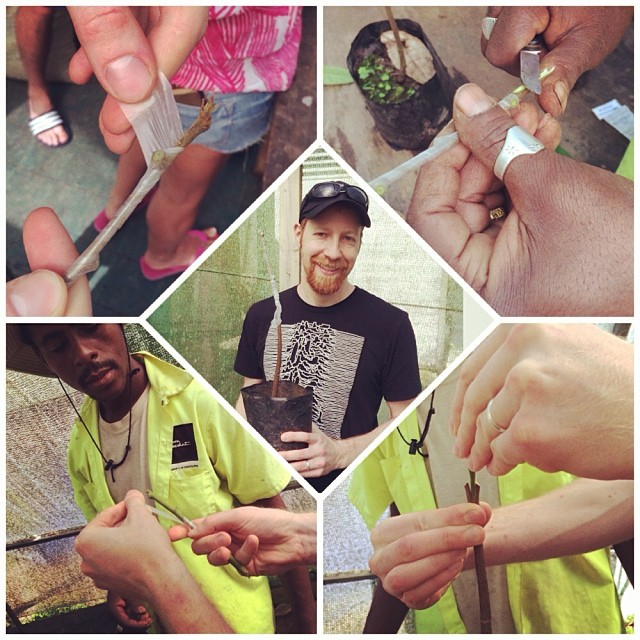
After finishing the grafting, we posed for photos with our handiwork. Hotel Chocolate carefully labels these plants to ensure that guests can find their cocoa trees on subsequent visits. It’s a clever marketing strategy but I wonder whether they can maintain it, given the frequency of these tours.
5. Turn Cocoa Nibs into Chocolate Bars
Congrats! If you’ve reached step 5, it means you have harvested, fermented, dried and replanted cocoa beans. As a reward for your hard work, you now get to indulge in homemade chocolate! All you need are cocoa nibs (pieces of dried cocoa beans), cocoa butter, a mortar and pestle and plastic chocolate bar molds. For those without access to farming equipment, you may want to start the chocolate-making process here.

First, place cocoa nibs in the mortar and start thumping down the pestle as fast and as hard as humanly possible. You should employe a mixture of pressure and rotation to ensure the nibs are thoroughly smashed into the bottom of the stone bowl. Next, add cocoa butter and continue pounding. After ten minutes, your wrist will throb and you’ll be tempted to give up. Keep going, or risk having a lumpy chocolate bar with an unpleasant dry texture. You want those nibs to be as small as possible!
After Cuthbert deemed our liquid chocolate to be sufficiently smooth, we poured it into molds that bore the Hotel Chocolate logo. As this was an upscale tour, our work was done– we retreated to the pool for lunch while Cuthbert swept the chocolate bars away to an unknown location.
If you don’t have a plantation supervisor at your disposal, you will want to Google the next steps or check out this instructional You Tube video.
6. Relax and Enjoy Your Chocolate!
Your work is now done and you can enjoy the fruits of your labor. An hour after our cocoa tour, Cuthbert tracked us down and handed us carefully-wrapped chocolate bars bearing our names. A blind taste test showed my chocolate bar was indeed the smoothest and the best, while Jake’s was quite coarse. Still, my bitter and relatively lumpy homemade chocolate posed no threat to the industrial candy complex.

The Bottom Line
Making chocolate from scratch is fun, but don’t expect to compete with Godiva on your first attempt. While the chocolate tour was the highlight of our trip to St Lucia, I’ll stick with store-bought chocolate bars from now on. If you do find yourself in St Lucia, make sure to find Cuthbert Monroque and pick his brain about the latest cocoa harvesting techniques and the right way to lop a cocoa pod (hint: never twist the stem).
Note: We paid for our own tour and received no compensation for this post.


Wow, that’s so interesting to see how chocolate is REALLY made. So cool you got to visit there!
It was a really fun tour! Very informative too– now I can open a cocoa plantation 😉